Session 2: Getting Started with Promptfoo
Goal: Run your first promptfoo evaluation using our LLMs
What We’ll Do Today
- ✅ Create a project folder and set up
.envfile with your API key from AarhusAI - ✅ Get the official promptfoo getting-started example
- ✅ Adapt it to use our LLMs via HTTP provider
- ✅ Run your first evaluation
- ✅ Understand the results
Part 1: Setting Up Your Environment
Step 1: Create Your Project Folder
Create a new folder for this exercise:
C:\Users\YourName\<projects>\promptfoo-getting-started
where <projects> is just a folder name where you can collect your VSCode projects - it can be called anything. Personally in my own setups I called it git_repos.
Open this folder in VSCode:
- File → Open Folder
- Select the
promptfoo-getting-startedfolder - Click “Yes, I trust the authors”
Step 2: Create .env File
In VSCode, create a file called .env (no name, just .env as extension) in the root of your project folder:
For now the file should just contain
DEV_OWUI_ENDPOINT=
DEV_OWUI_API_KEY=
STG_OWUI_ENDPOINT=
STG_OWUI_API_KEY=
PROD_OWUI_ENDPOINT=
PROD_OWUI_API_KEY=
Why we need this: The .env file is a way to store “local” variables. We will use it to store our API endpoint and credentials semi-securely. Promptfoo will read these values when running evaluations.
Step 3: Get Your API Key
We need to extract your API key (token) from the browser.
3.1 Open DevTools
- Open Chrome/Edge browser
- Navigate to:
https://stgai.itkdev.dk - Press
F12or right-click → “Inspect” (“Inspicer”) or follow:
- Click the Network tab

3.2 Trigger an API Call
- In the chat interface, type any question (e.g., “Hej”)
- Send the message
- In the Network tab, you should see e.g. a
completionsrow appear. Click it.
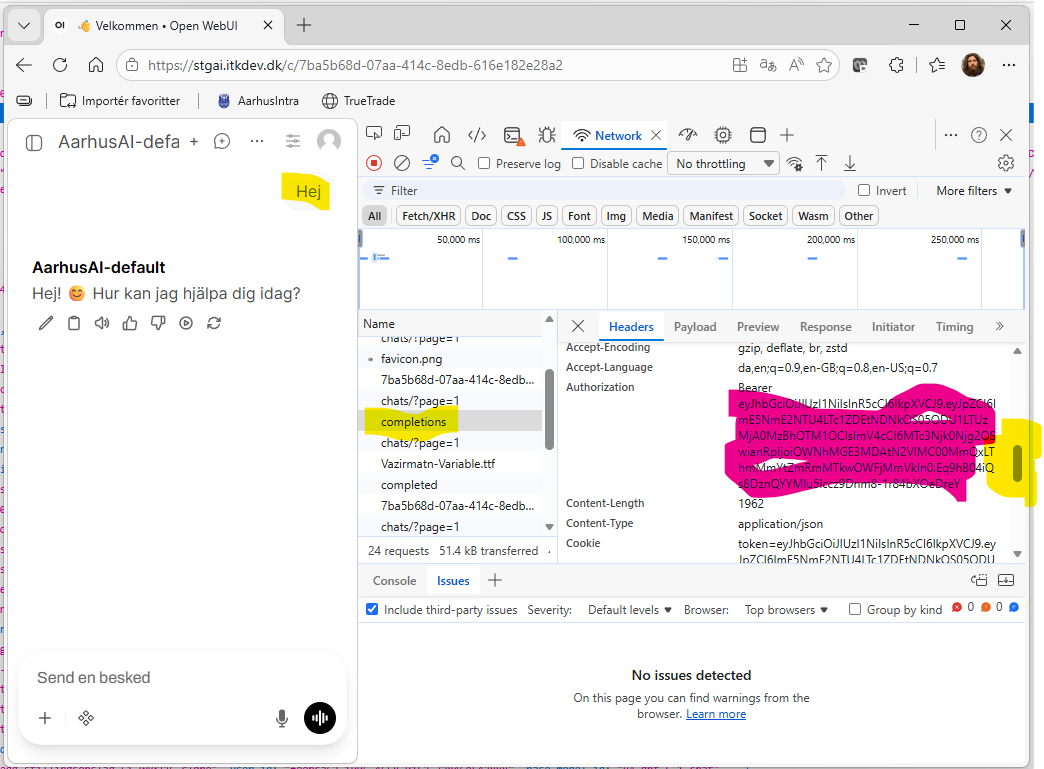
3.3 Find the Authorization Header
- Look for Headers tab (usually selected by default)
- Scroll down to Request Headers
- Find
Authorizationheader, as seen in the screenshot above - it will look like:Authorization: Bearer eyJhbGciOiJIUzI1NiIsInR5cCI6IkpXVCJ9...
3.4 Copy the Token
Copy the entire value after Bearer (just the token, not the word “Bearer”). It will start with eyJ...
Step 4: Add API Key to .env
Back inside VSCode, update your .env file:
DEV_OWUI_ENDPOINT=
DEV_OWUI_API_KEY=
STG_OWUI_ENDPOINT=https://stgai.itkdev.dk
STG_OWUI_API_KEY=<eyJhbGciO... something your actual token goes here>
PROD_OWUI_ENDPOINT=
PROD_OWUI_API_KEY=
Exercise
Do the same for ai.aarhuskommune.dk and obtain the api key / token for the production site (and update the .env-file variables PROD_OWUI_ENDPOINT and PROD_OWUI_API_KEY).
Part 2: Get the Official Getting-Started Example and change providers
Step 1: Download the Example
In the VSCode terminal, run:
promptfoo init --example getting-started
This creates a getting-started subfolder with the official example.
[!TIP] running
promptfoo init --examplein the terminal gives you the choice of a wide range of examples, which can also be seen here
Step 2: Look at the Original Config
Open getting-started/promptfooconfig.yaml. You’ll see:
# yaml-language-server: $schema=https://promptfoo.dev/config-schema.json
description: 'Getting started'

prompts:
  - 'Convert the following English text to {{language}}: {{input}}'

providers:
  - openai:chat:gpt-5.4
  - openai:chat:gpt-5.4-mini

tests:
  - vars:
      language: French
      input: Hello world
    assert:
      - type: contains
        value: 'Bonjour le monde'
  - vars:
      language: Spanish
      input: Where is the library?
    assert:
      - type: icontains
        value: 'Dónde está la biblioteca'
What this does:
- Tests translation prompts
- Uses OpenAI models (
openai:chat:gpt-5.4) - Has 2 test cases with expected answers
How to talk about it (the text in the yaml file) … Below comments (text after a hashtag #) provide a bit of explaining and nomenclature.
# yaml-language-server: $schema=https://promptfoo.dev/config-schema.json
description: 'Getting started' # "description" is an object or key to which a string is assigned

prompts: # a newline and indented dashes `-` makes the objekt a list of elements
  - 'Convert the following English text to {{language}}: {{input}}' # this string is only element in the prompt list
                                                                    # the string includes the two variables `language`
                                                                    # and `input` identified by the double braces `{{}}`

providers: # another list (this time with two elements)
  - openai:chat:gpt-5.4 # this string is the first element of providers, it is special to promptfoo as it will be
                        # recognized as a certain provider of `completion` or `inference`, that would be text generation
  - openai:chat:gpt-5.4-mini

tests: # Yet another list with two elements, this time the elements are not strings, but objects (recognised by having
       # keys assigned with `:` to other objects
  - # the indented dash `-` indicates the start of an element in the list
    # The elements of the "tests" list is, in promptfoo-lingo, called test-objects
    # A test object consist of a number of possible objects among those `vars` (variables) and `assert` (list of
    # assertions)
    vars: # the variables object, that defines values (strings most often) to be substituted in, where the variable is
          # used in a text string (in our case, up above in the prompt string)
      language: French # In this testcase language should be substituted by French
      input: Hello world # ... and input should be substituted by Hello World
    assert: # the object assert is defined at a list (see the indented dash `-` on the next line) of assertion objects
      - # Assertion objects consist of e.g. `type` and `value` objects, that defines the assertion that the test case
        # should be evaluated against in order to pass the test
        type: contains # This string is special to promptfoo and defines which type of assertion promptfoo must use to
                       # check if the test is passed. A `contains` assertion checks if the text provided with the
                       # `value`-key is part of the text generated by the provider
        value: 'Bonjour le monde'
  - vars: # The variables-object of the second element in the tests-list
      language: Spanish
      input: Where is the library?
    assert:
      - type: icontains # The `icontains` assertion is similar to the `contains` assertion but the check is insensitive
                        # to the case of the sting
        value: 'Dónde está la biblioteca'
Problem: We don’t have OpenAI API keys. We want to use our LLMs instead.
Step 3: Change provider
Instead of using the OpenAI providers, we’ll use the HTTP provider to connect to our LLMs.
[!NOTE] In the promptfoo docs all the supported LLM Providers are listed. The http provider, that we will now use is the swiss army knife of the native Promptfoo providers, but promptfoo also support custom providers, which is what we’ll be using in the next session
Change the provider string openai:chat:gpt-5.4 element to this http provider element:
id: https
config:
  url: <API endpoint providing the inference/"text generation">
  method: 'POST' # Information for thge http(s) protocol that we are going to send some text bytes (from the body
                 # object below) to somewhere on the internet (defined by `url`) and we expect to have some text bytes
                 # returned to us
  headers:
    <Header object with info fo the API service>
  body:
    <Body object with content for the API service to react on>
  transformResponse: <JavaScript string defining how the returned object should be transformed to extract the generated text>
and now we need to specify each of the remaining elements in the config object:
url:
In the url-string we need to use the environment variable from our .env-file. We want to access models through the AarhusAI staging platform and promptfoo make environment variable accessible through {{ env.<NAME> }}. In our case the environment variable STG_OWUI_ENDPOINT only contains the main site and not the “path” or “route” to the actual API endpoint. Thus, the url-string need to be {{ env.STG_OWUI_ENDPOINT }}/api/v1/chat/completions in order to reach the chat completion endpoint.
[!NOTE] Full documentation of the various endpoints are available at stgai.itkdev.dk/docs - but no need to check that now
headers:
The headers object is used to provide information to the API service and need to contain the following two objects:
'Content-Type': 'application/json'that tells the API service how to interpret the provided body-data and how to respond'Authorization': 'Bearer {{ env.STG_OWUI_API_KEY }}'
that informs the API service how you would prove that you are entitled to use the API service. Notice that here again we use promptfoos feature to let us paste in variables from the environment variables in the.env-file
body:
The body object contains the variables that are expected by the endpoint. Specifically a chat completion endpoint expects
-
a message struct with the messages from which the LLM should continue and generate an “assistant” message (answer). Its simplest form look like
'messages':
  - role: user
    content: '{{prompt}}'
where the prompt-variable is a special variable, that will be replaced by an element from the prompts-list
-
a ‘model’ string specifying the id of the LLM, that should be used to generate the chat completions (that is the assistant message). In our case we will try the model
default, thus add the object:
'model': 'default'
Output transformation:
The result returned by the API service is stored by promptfoo in a variable called json and we know that this endpoint follows the OpenAI standard (pretty closely) for providing chat completions. Thus, if we are interested in the actual generated answer (and not the id, timestamp, token usages etc. etc.) then we can provide the following response transformation as the final object in the config-object:
json.choices[0].message.content
You should end up with a yaml configuration looking like
# yaml-language-server: $schema=https://promptfoo.dev/config-schema.json
description: 'Getting started'

prompts:
  - 'Convert the following English text to {{language}}: {{input}}'

providers:
  - id: https
    config:
      url: '{{ env.STG_OWUI_ENDPOINT }}/api/v1/chat/completions'
      method: 'POST'
      headers:
        'Content-Type': 'application/json'
        'Authorization': 'Bearer {{ env.STG_OWUI_API_KEY }}'
      body:
        'messages':
          - role: user
            content: '{{prompt}}'
        'model': 'default'
      transformResponse: json.choices[0].message.content
  - openai:chat:gpt-5.4-mini

tests:
  - vars:
      language: French
      input: Hello world
    assert:
      - type: contains
        value: 'Bonjour le monde'
  - vars:
      language: Spanish
      input: Where is the library?
    assert:
      - type: icontains
        value: 'Dónde está la biblioteca'
Exercise: Change the remaining provider
Change the remaining openai:chat:gpt-5.4-min provider to another http-provider using the same endpoint as the first one, but using the model “AarhusAI-default”, which is what OpenWebUI denotes a base-model. This means that OpenWebUI do not add any system prompt or other argumentation, but simply pass the request directly on to the completion endpoint that is set up with OpenWebUI. Behind the id “AarhusAI-default” is the famous mistral model that is hosted on Computerome hardware at Risø.
Hint: The new provider object is a full copy of the one we wrote in step 3 only with the model string changed to “AarhusAI-default”
Hint: In order to distinguish the two http providers you can add a label-key to each provider-object being a string that will be shown in the promptfoo UI.
Part 3: Running Evaluations and inspecting results
Step 1: Run Your First Evaluation
In the terminal (make sure you’re in the project root) run:
promptfoo eval --config getting-started/promptfooconfig.yaml
This will make promptfoo run the tests through the specified providers.
Step 2: View the Results
In the terminal:
promptfoo view
You should now be asked whether you like to open the web view in a browser. Choose yes or navigate manually directly to http://localhost:15500. (Notice: that eventhough this looks like something on the internet, then this webservice runs on your local computer and no one else is able to access it.)
You’ll see:
- Variables
- Providers
- Pass/Fail status and statistics
- Actual response from the LLM
Click on the looking-glas icon to see the test details:
- The question
- The actual answer
- Which assertions passed/failed
Exercise: Change something
Change something in the yaml config. E.g.
- some of the variables
- add some text to the
contentin the user-message or maybe preceed the user-message with a system-message element in
the messages list. The system message should be of the formrole: system content: 'some instructions with or without variables' - Add another test case
- Add an extra assertion to one of the test cases (maybe the
starts-with-assertion or theword-count)-assertion, which are both relative simpel assertions.
Each time you make a change, run the eval again:
promptfoo eval -c getting-started/promptfooconfig.yaml
and update the page in the browser to see the changes. Look around the website to find an overview of all the evaluations you have run and try switching between them.
Exercise: Find the secret api token
Look around the website and find the exact yaml config used to generate the evaluation and notice that here the “secret” environment variables are actually displayed.
Next Steps
… the revealed environment variables are one of the things we will try to mend when moving into our actual use in Session 3: MBU Evaluation. Here we’ll explore a real evaluation config with many test cases.